|
Well, got my gear back, so I am back on the Corsair.
Here are some more pics for you. Here is the center section with the
Likes gear installed. The tires are 9 inch compressor utility tires
|
 |
 |
|
|
These are just some shots of the flap hinge set-up and
the 1/4 ply plate that will tie the inboard and center flap together.
Took some patience to get the plate to slide smoothly, without binding
or becoming sloppy. I will seal with some Minwax to prevent wood swell.
Also shown is the inboard flap servo mount and the 4-40 bolts that will
bolt the control horn on...no screws here |
 |
OK...I have the entire center section sheeted on the top side. The
areas you see left open are to get clamps in when I clamp/glue the outer
panels to the center section. I have left the sheeting overhanging to
glue across the top of the outer panels out to rib 9. I will do the
same on the bottom. This will add a little more strength to the joint.
Very tedious work to fit and sand and shape these sheets to fit. When
you bend the sheets thru the gull, you loose your straight edge on the
balsa sheet, and you must hand sand and fit every sheet. Ziroli does
give you patterns for the front 3 sheets of the center section, and
they fit nicely. However, that only accounts for about 2/5th's of the
total center section sheeting, which leaves a lot for you to do. I have
about 6-8 hours in just sheeting this section. Also, you cannot pre-join
the sheets, and must sheet one at a time, which leaves it looking a
bit rough, which is why you see all the filler. I have placed a standard
93 inch Ziroli fuse in front of the center section for a size comparison.
I am now in the process of sheeting the outer panels. I have to remotivate
after a nice vacation.
|
I am nearing completion on building this monster. I have the
center section sheeted on top. I have one outer panel fully sheeted and
the other panel 1/2 sheeted. I expect to join the wings next weekend. This
is a shot of the 1/8 balsa leading edge sheeting going on. The can of paint
is to hold the wing down on the jig strip. You can see the spar braces poking
out the end. These are of 1/2 by 5/8 maple that will be glued and gusseted
to the center section. I have 2x2 pine triangle stock holding them gusseted
to the wing panel, top and bottom
|
|
 |
Here, the wing panel has been completely sheeted. I left the
inner bat open to get clamps on for when I glue the panels to the center
section. I will sheet this area after wings are joined. The bottom side
was all planked with 1/8 balsa. On the top side, the area boxed in red
was covered with 3/32 balsa. the outer perimeter (leading edge, wingtip,
and aileron) was covered with 1/8 balsa. I will show you why in a second.
The outer flap was also sheeted with 3/32 balsa. Fully sheeted wing panel
weighed in a 5.5 pounds. Pretty light for a wing panel that is a 31.5
inch chord and 52 inches in length
|
The F4U-1A had a fabric covered outer wing panel, with the
exception of the aluminum skinned leading edge and gun bay covers/area.
The outer flap was also fabric covered. Now, I want a fabric wing, but I
did not want that big open bay. I did not want to worry about a wing warping
with all that structure open. So, by sheeting the leading edge and gun bay
area with 1/8 sheeted, and the ribbed area with 3/32 balsa, I would have
a fully sheeted structure that would not twist. By adding 1/32 hard balsa
strips in the rib locations, They will taper in flush with the 1/8 sheeting.
I will get the effect of a fabric covered wing, without the worries. I will
glass the 1/8 balsa areas and fabric cover the open bay area, and apply
scale pinking tape. The F4U-1A also had a wooden skinned aileron that was
fabric covered, so I will fabric cover this as well. Almost done gluing!!!!!!!!!!!!!!!!!!!!
|
 |
 |
Well...here is where things slow down a bit. I have moved
the project out to the garage for final assembly. It outgrew my garage.
I am fitting the center section to the fuse prior to fitting the outer panels
on. I figure much easier to work with a 54 inch center section than a 152
inch wing. I have the wing fit. Took some sanding of the wing saddle to
get a good fit. I have the wing square within 3/16 trailing edge, left to
right. Anymore fiddling, and the wing is bounced off level with the wing
saddle due to the odd shape of the saddle. I figure 3/16 spread out over
13 feet is pretty darn close. Pappy will never notice. You can get an idea
of the size of this bird. This picture shows the center section on the fuse.
That is a 48 inch level in the picture. Sorry for the poor quality of the
pic, but this is a cheap digital and it was dark out. I will drill the bolt
holes tomorrow. Then...time to assemble the wing.
|
Here is the fabric that has been applied to the outer panel.
I zapped the edges with some thin CA to lock it in place. I will glass around
the fabric. After glassing, I will dress the joint up by applying some pinking
tape a-la full scale. Glassing is next.
|
 |
 |
Here is a pic of my ugly mug standing behind
the 155 inch Corsair wing.
|
Ok....update time. I have joined the outer panels to the center section
and fit the wing to the fuse. I now have a 13 foot wing (well...155 inches
anyway). I have the flaps and ailerons all fit. I am smoothing out the wing
and will glass/fabric cover it this week. The all up weight of the wing
with the gear and servos is 39 pounds. I hope to have it up on gear for
a photo by Saturday, Looking like a corsair now...that's for sure. Got a
cowl coming from Bob Sealy of Cookville, TN. I owe him a great thanks for
saving me the trouble. He is the expert. Thx Bob. |
OK...I just got my cowl. Bob Seamy. of Quality Fiberglass,
built the cowl for me (I did pay him). The cowl is superb quality. It has
3 layers of 6 oz. cloth, topped with a final coat of 4 oz. cloth. It measures
20.5 inch diameter in the back and tapers to 16 7/8 inch diameter in the
front, with a length of 15 3/4 inch. I can't thank Bob enough for making
this for me, and saving me the hassle. My daughter decided to try it on
as a new shirt.
|
 |

|
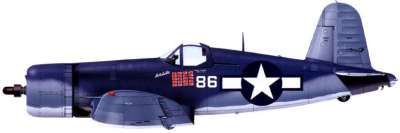
OK...finally got the digital working again. Plane is all first
primer coat. Here is the pilot guy (Pappy) in his new mount. Partial cockpit
includes dash, seat, headrest, throttle quadrant, control stick and seat
belts....slim pickings.
|
| Here is a shot of the fuse front end with the cowl installed |
 |

|
3/4 rearview |
Close-up of the tail showing some panel lines, inspection hatches, panel
lines, trim tab and boost tabs. |
 |

|
Picture of the upside down wing with belly pan installed,
all primed, flaps and ailerons yet to be installed.
|
|
Close up of the wing oil cooler/carb inlet area.
|
 |
BACK to PROJECTS
|
|
Become an RCWarbrids site supporter by making a donation.
|
$5.00 |
 |
$10.00 |
|
$15.00 |
|
$20.00 |
|
| |
|
|
|
|


